LEDs are an amazing piece of technology that are found in all sorts of electronic devices. They are also a great tool to teach kids about electronics. They are low voltage and safe to use, come in all different colors, and turning on or changing the color of an LED with circuitry or code provides satisfying visual feedback when the circuit is built correctly.

Corvian students, L to R: Austin Boyd, Esam Samara and Troy Harris
In part one, I discussed the history and theory of LED technology and how they are used. In this second installment, as with the second-grade class and their flashlights, I will focus on practical applications and knowledge LEDs and how to use them in your next prototype.
LED Packages
LEDs come in two main styles or packages, “through hole” and “surface mount.” Through hole-type LEDs have two legs that stick out of the bottom of the LED element and lens. The longer leg is always the positive connection, the shorter the negative. The lenses often have a flat molded into it, which is another way to denote the negative side of the LED after the legs are trimmed. The LEDs are installed by pushing the legs through holes in the circuit board and soldered into place with the lens sitting flush or hovering slightly above the circuit board.

Comparison of a through hole LED and a strip of surface mount LEDs.
Surface mount LEDs are much lower profile and are mounted directly to the face of the circuit board. On a single color LED, the negative side is denoted by a notch or other asymmetry, but the datasheet should always be consulted before wiring. These can be hand soldered for prototyping, but are typically placed on a circuit board with a robotic and baked in a special oven to melt the solder over the terminals to make the connections.
There are also many different configurations of multiple LEDs. The LED string is a flexible circuit of LEDs that are all wired together and can be coiled up into a roll. These often have an adhesive backing which makes mounting them very easy, and they have simple connectors to hook them up to power.

Strip LEDs were used to make these “Creepy Underwear” that were inspired by the book “Creepy Pair of Underwear” by Aaron Reynolds and Peter Brown
LEDs are also available in grid arrays or in rings. The grid arrays allow for the rendering of images, like in large outdoor video screens or in smaller displays. The circular LEDs are an interesting form factor that is useful for making gauges or to fit into circular product designs.

LED rings are an interesting form factor to create some nice effects.
Types
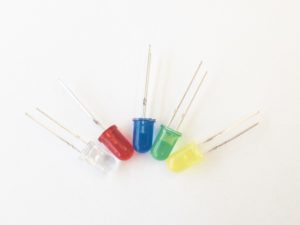
There are many different types of LEDs that are denoted primarily by their color traits. Single-color LEDs are the most common and least expensive. They are available in many different colors such as red, green, blue and yellow. These are typically used for simple indication in a circuit such as if a burner is active on an electric stove.
The next step up is the RGB LED. The RGB has three different LEDs within the same housing, a red, blue and green, hence the RGB monicker. They typically have four connection points, a common positive and a negative connection that corresponds to each color. RGBs can be used discreetly to provide the red, green or blue light, or they can be mixed to create interstitial colors. Mixing can be done by providing different current levels to each of the three colors, or it can be done with a microcontroller like an Arduino.

RGB LEDs can be turned on simultaneously to create intermediate colors. I made this “color piano” with my youngest daughter Ivy where each key would turn on one color component. Here I turned on the red and the blue.
RGBs may seem like the ultimate LED style, but they have a major drawback in that all RGBs that are wired up together will only show the same color or brightness at the same time. Addressable LEDs solve this problem and make it possible to create some interesting effects. Addressables have a small circuit embedded inside the RGB LED that takes commands from a controller. Each LED in the string takes their command to display their color and brightness, and sends the next command down the line to the next LED. This makes it possible to do rainbow effects or to make a moving bar of color like the lights in the grille of KITT from the 80s TV show Knight Rider. A great library of sample effects can be found here.
Addressables have a slightly different pin layout in that they have positive, negative, data in, and data out. There are different styles of addressables, but most can be driven by Arduinos or other microcontrollers with simple code from libraries such as the Adafruit Neopixel library or the FastLED library.
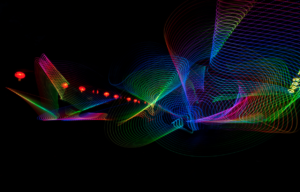
This long-exposure image was made with a string of addressable LEDs that were taped to a stick. My oldest daughter, Harper, then waved it around a field while it was doing its rainbow pattern to create the effect.
Powering an LED
Lighting up an LED is not hard but does require some care so that it is not inadvertently blown up. Each LED has its own desired voltage level that it needs to function as well as a maximum amount of current it can handle without burning out. You should always consult the datasheet of the LED being used to guide how it is powered, but generally red and yellow LEDs need about 2-2.5V and green, blue, and white need 3.5V. Garden variety LEDs can handle about 30-50 milliamps of current. If you have a power supply or battery that is tuned to the requisite voltage, you are good to go however this is rarely the case. More commonly the battery or power supply has excess voltage which needs to be throttled down with a resistor to power it safely. Prebuilt LED strips and arrays are much easier to power. They are manufactured with the requisite resistors already in place and need only to be wired up with a battery or power supply of the right voltage and enough current capacity. Note that the more LEDs you have in an array or strip that you want to run at one time, the more current your power supply needs to have.

An LED is connected to a digital output pin on a Particle Argon microcontroller. Note that a resistor has been added to throttle current to it to keep it from burning up.
Choosing an LED
There are thousands of different options when choosing an LED for a specific application, so it is important to narrow the options with some key metrics. Here are the main attributes and how to choose.
- Color. The primary requirement for many applications is the color. If standard primary colors are adequate, you can likely choose a low-cost single color LED, but if you want color-changing or interstitial colors, then an RGB LED is a better choice.
- Brightness. Most cheap LEDs are very bright and adequate for most applications, but special high output LEDs are available. Note that high brightness requires more power and you may also need to add cooling to support the increased output. Brightness is measured in millicandelas and most LEDs are in the 1000-10,000 mcd range and high output LEDs can be upwards of 100,000.
- Viewing Angle. LEDs are brightest right above the semiconductor element and the brightness tapers off as you start to view it from the side. Narrow viewing angle LEDs are good for creating directed points of light or for maximum viewing distance. Larger viewing angle LEDs will have softer, more distributed light, but will have deceased maximum viewing distance.
- Luminous Flux. Lumen are the common unit for luminous flux. It is calculated from the brightness in millicandelas and the viewing angle of the LED. The brighter the LED and the larger the viewing angle, the larger the Lumen output. Most LEDs fall into the 1-5 lumen range, but high output varieties can output 100s of Lumens.
- Electrical Requirements. It is import to choose LEDs that have a voltage and current draw that is available from the rest of the circuit. For example, it is not prudent to use a 12V LED string if you only have 5V available from your circuit.
Fortunately, LEDs come in many different colors to satisfy the needs of protoptypers.
There is quite literally a whole spectrum of LEDs available to help us light up our prototypes. The technology resident in each tiny LED is an immense technical achievement that has been refined over nearly a century and honed down into a package that is both useful and inexpensive. A huge percentage of electronic products have at least one LED for indication or for the need of the light itself. They are quite easy to design into a circuit or to use off the shelf in pre-packaged strips or modules. As long as their current and voltage requirements are respected, they can help provide low cost, low power lumens for your next prototype.
Work With Us
Want to learn more about how we’d prepare your product for launch? Request a quote today.
Want To See This Advice In Action?
Check out our case studies and learn more about how we’ve achieved stellar results for our clients.