Enventys Partners’ Jeremy Losaw collaborated with Wily Design to create a full-scale cardboard Model T for the End 2 End: Tech Symposium event in Charlotte, NC. Learn how laser cutting methods impacted their build as well as how other methods can speed up the product development process.

Enventys Partners collaborated with Wily Design to create this full-scale cardboard Model T for the End 2 End tech symposium.
Laser Cutting Methods for Product Development
Laser cutting was crucial to being able to build the Model T and is an indispensable tool in the Enventys Partners shop. It is versatile, easy to use and allows designers and engineers to make prototypes very quickly. The following are some of my favorite ways to use laser cutters to make great prototypes.
Tongue and Groove
Most laser cutters are built to handle sheets of material, so you cannot directly build 3-dimensional prototypes with them. However, by designing parts with a tongue and groove on the edges, multidimensional parts can be made. To do this, the part is drawn as a series of flat parts and crenellations are added at the end. After the parts are cut they can be glued together to form the desired shape. This takes advantage of the speed of the laser to build parts in minutes that would otherwise take hours on a 3D printer.
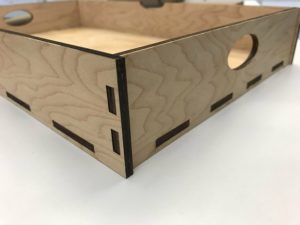
This drawer was made by Patrick Bailey, one of the Enventys Partners engineers, with the tongue and groove technique.
Making Curves
While some flat materials are thin enough to bend into curves, some are too brittle and thick for this to work well. However, with clever design, flat parts can be made to form pleasing curves. By adding strategically placed cutouts to the flat pieces the structure is weakened and can be flexed into a curve. Combined with the tongue and groove technique, aesthetically pleasing prototypes can be created with this simple technique.
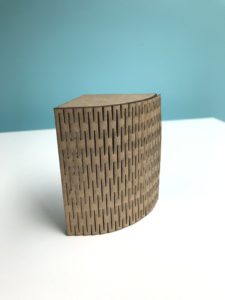
This cardboard part was cut with a pattern that would allow it to easily bend around a corner instead of a crease.
Material Stacking
Laser-cut material stacked together can be used to create fully solid 3D prototypes. The best way to do this is to split the CAD model into layers that are as thick as the cut material, cut each two-dimensional layer on the laser and bond them together. This is the technique I used to build the cardboard Model T. This gives a layered look that is reminiscent of the layers of a 3D print but is fully solid. The parts can be left as is or can be filled with glue or Bondo to smooth the regions between layers. This a good technique to build thermoforming molds to make thin plastic parts, too.
Creating the layers in CAD can be time consuming, especially for a large model with thin layers. Fortunately, Autodesk has Slicer, a free program that makes the layers automatically and even creates the cut files. Slicer also can add numbers to each part to identify each piece in the assembly order, and it can add holes for dowel pins to make the assembly easy to build and more sturdy. This software was crucial to the success of my Model T build and is highly recommended for anyone who wants to try this technique.
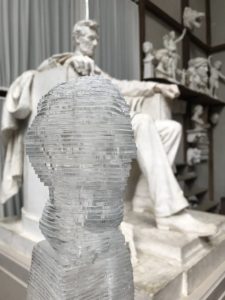
I used a laser scan file to create this bust of Lincoln from laser cut acrylic sheets. It is shown here at the Chesterwood Museum, which was the former studio and home of the sculptor of the Lincoln Memorial, Daniel Chester French.
Reverse Side Etching
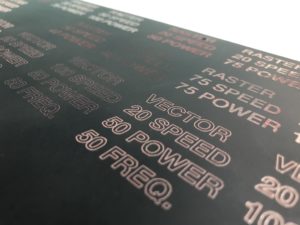
In addition to cutting, laser cutters can be used to etch material. This is where the laser uses a faster traverse speed and lower power to selectively burn the material to create an image. The burned surface of the image creates a nice contrast between it and the raw material.
One of the most often used applications for this technique is for making LED lighted signs with clear acrylic panels. LEDs are directed towards the etched area, and everywhere the material is etched will glow to form the desired image or logo. To give these pieces a finished look, it is best to etch the image on the backside of the clear acrylic which leaves the front of the sign smooth. The trick to making this technique work is understanding that the art for the sign needs to mirrored on the vertical axis. It will look upside down during the etch, but will read correctly once flipped over.
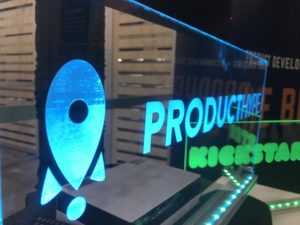
These Product Hype and Kickstarter signs were made for the Enventys Partners booth at CES 2019. Reverse etching was used during the build.
Pattern Etching
While there are some laser cutting machines that will cut metal, most hobbyists or intermediate-grade lasers will not. However, you can still use them to help make metal parts. Most lasers will be able to etch through anodized coating, which erases the color of the anodizing and leaves the metal color to create your design. Lasers can also etch away layout fluid (sometimes called bluing dye due to its blue color.) A technique we use from time-to-time requires coating a piece of metal with layout fluid, then etching a cut pattern in the dyed areas. We can then follow the etched lines with a saw or grinder to cut the metal to the desired shape.
Work With Us
Want to learn more about how we’d prepare your product for launch? Request a quote today.
Want To See This Advice In Action?
Check out our case studies and learn more about how we’ve achieved stellar results for our clients.