Developing a product from start to finish is just as rewarding as it is risky. Before investing resources into a project, it’s wise to calculate how long each product development step will take. To help you estimate, Enventys Partners explains the general timeline to consider when bringing a product to market.
How to Estimate a Product Development Timeline
When you decide you want to create a new product, it’s smart to ask, “How long will it take to get this idea into the hands of a customer?” The answer is almost always much longer than you’d think.
While the product’s complexity and the developer’s skill generally dictate how long the product development process will take, those aren’t the only things to consider. In this blog, we’ll cover what you’ll encounter with each product development step and how that will relate to the total timeframe for bringing your idea to market.
What is Product Development?
When most people think of product development, prototyping is usually what comes to mind. While that part is important, so are the other seven steps of the product development process. The term “product development” encompasses the entire process of transforming a concept into a finished product that’s available for sale to the public. Product development involves many different areas of expertise including design, engineering, manufacturing, marketing and more.
The 7 Steps of Product Development
A product development timeline can fluctuate based on a number of factors. That’s why breaking down each phase of the process into small increments is crucial. When building your timeline, overestimate how long each independent stage will take, because it’s always better to finish early than encounter delays.
1. Idea Generation
Everyone has ideas, but whether they become products or businesses is what separates entrepreneurs and inventors from everyone else.
The Idea Generation phase is a systematic approach to brainstorming and narrowing down ideas into a more focused concept. If you are looking to expand your product offerings, you may already have a team in place to help with this step.
Whether you knock out the concept in one idea generation session or develop it over time, this stage is one the quicker ones in the product development process.
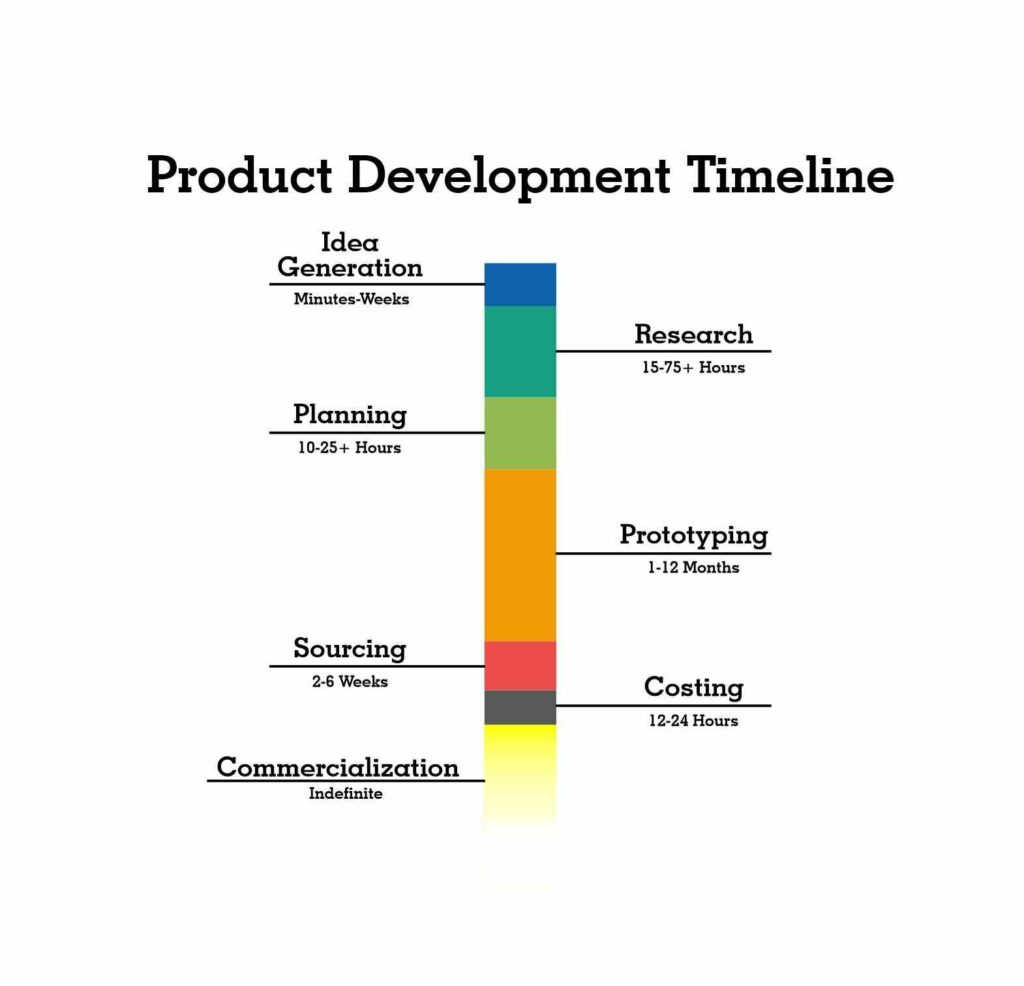
Timeline to Completion: Minutes to Weeks
2. Research
Once you have a great idea, the next step is to validate it. Conduct thorough market research including competitor analysis, feedback solicitation and more. Just note that the best way to research your target market will vary from product to product.
Investigate products that provide similar benefits to yours, or solve similar problems. You’ll also want to fully understand the size (by users and dollars) and the breakdown of your product’s target market. Doing market research also allows you to evaluate the feasibility of breaking down any barriers to entry. At this stage, your goal is to decide if you have a competitive advantage that’s strong enough to support your business.
You may be doing this stage yourself, with an internal team, or in collaboration with an external firm or agency. The amount of time spent on the research phase will greatly differ depending on the complexity of the idea and the “newness” of the market. If you are pioneering a whole new industry segment for your product, it will take more time to research compared to a simple product with similar variants on the market already.
Timeline to Completion: 15-75+ Dedicated Hours
3. Planning
Planning out how you’re going to make a profit is the last stage before prototyping begins. It’s important to take your time to get everything prepared because once you begin the prototyping phase, things tend to move very quickly. Once you are satisfied with your idea and research, you must compile your research findings, descriptions and drawings of your idea, including details regarding components, materials and functionality. You should have enough information to clearly express the product and its features to the user.
This is also a good time to determine what categories, such as luxury or utilitarian, your product falls into. When considering your market, it is useful to explore various pain points your product could alleviate as well as price points your product could compete in. Materials can also be investigated at this point but those final decisions won’t be made until the prototyping phase. If you have kept good notes and records in the previous stages, this won’t take long but ensure you leave yourself enough time to fully organize all the information.
Timeline to Completion: 10-25+ Dedicated Hours
4. Prototyping
Prototyping is the process of creating samples in order to test and refine your product’s features before it gets finalized and sent to production. This phase begins with taking the sketches from the previous phase and turning them into bonafide designs made in CAD programs.
For your product to work correctly, look appealing and feel good to use, you’ll probably have multiple rounds of edits with feedback constantly taking you back to the drawing board. It’s unlikely that the first iteration of your product will be perfect for production, so don’t worry if each new prototype differs by only small adjustments.
Depending on the complexity of your product, sometimes prototyping can be completed entirely at home, but other times it can take painstakingly long amounts of time and a tremendous amount of resources. For the most part, the path to creating a Beta Build or final prototype that is ready for production follows this 5-step path:
Proof of Concept
The first stage is basic, but absolutely essential. You have conceptualized your product and see that it works on paper, but now you need to see if your idea will actually work in practice. The earliest model of your product will likely not resemble your product vision in the way it would be seen by the customer. This is because at this stage you’re just testing out smaller subsets of the mechanical or technological aspects of your product. Proof of Concept prototypes simply exist to confirm the validity and viability of your idea and design. Depending on the complexity of your idea, the Proof of Concept stage may include several different parts in order to confirm that each aspect works as intended independently, then all together as a cohesive unit.
Design for Demonstration
Once you’ve validated the functionality of your design, and know that your idea will work, you can start to get your product off the ground. If your project needs funding, investors need to be able to see and understand what they are going to be investing in. Design for demonstration prototypes apply the functionality of elements verified in your proof of concept prototype and combine them into a demonstrative unit. The unit isn’t perfect, but it is good enough to relay the appropriate information to potential investors in a tangible way.
Functional Prototype
Now that you’ve secured funding for your project, you can start working on the true fine tuning. A functional prototype is a fully operative unit with a rough design for how you’d like the product to look and feel. The design has not been finalized quite yet, but at this stage you’ll be able to see the idea coming together.
Aesthetic Prototype
Now that you’ve just about pinned down the form and function of your product, you must decide some very important qualities that will affect its look and feel. In the aesthetic prototyping stage, you need to decide on the finer and more specific details of the shape, color and material of each component to determine which one or ones will be just right for your product’s needs, appearance, function and budget.
Alpha and Beta Builds
Now that you’ve determined the form, function, material and appearance of your product, the alpha prototype is the actualization of these decisions. The alpha prototype is the first time throughout the prototyping process that you will have a physical version of all elements of the previous prototypes in one complete form. Using the feedback you receive to make any additional changes, you can now produce your beta prototype. This prototype is the first unit of your fully market-ready product.
Timeline to Completion: 1-12 Months
5. Sourcing
At this point in product development, you need to start building your supply chain. Deciding on materials, packaging, manufacturer, storage, shipping, logistics, fulfillment and sales strategies may be involved in sourcing. One of the considerations you will need to look at is whether you would like to produce your product overseas or domestically. Sourcing may take longer if you are looking overseas because of communication barriers, time zone differences, increased logistic complexity as well as shipping times of proofs and full-scale orders can play into the equation more than with a domestic supplier or manufacturer.
Timeline to Completion: 2-6 Weeks to source, and up to 6 months until production is set up and ready, depending on complexity
6. Costing
Now that you’ve made most of the important decisions surrounding the creation of your product, you have a good idea of what expenses will be associated with it, and you can take a good estimate of the cost per unit. You can gather this information to calculate your overall cost of goods sold and determine what an ideal selling price will be for your product in order for you to reach the margins you’d like. At this stage you can also evaluate quotes and offers against each other to determine the cost advantage of one option over another. This is a relatively brief step, and it is likely that you will be able to complete this step alongside the sourcing stage, in the downtime between active work and communication with suppliers.
Timeline to Completion: 12-24 Working Hours
7. Commercialization
Your product is now almost market-ready. With a larger team, it may be time to hand off the project to the marketing department, but, with a smaller team, you may need to redirect your attention or outsource marketing to get this product in front of potential buyers. You are now through product development and onto selling, and selling will go on for as long as the product exists.
Timeline to Completion: Indefinite
The Overall Product Development Timeline
The overall timeline is highly variable, as you’ve seen, so it’s important to overestimate your timeline. However, based on the time estimates we have discussed, you can approximate your product development process to last between 2 months for a simple project and 2 or more years for a highly sophisticated product.
Take all of your independent factors into account from team size, project complexity, outside deadlines, and the amount of time you have to dedicate to the project (whether it is your full-time gig or a side project you work on during weekends). Use this guide to liberally estimate each stage of the process, then add up the time estimates for each stage to create a working timeline for your project.
Let Enventys Partners Help
The entire product development process can be difficult, but our team of experts can help. We’re able to guide you through the entire process to cut down on time and stress associated with making your dream a reality. Reach out to Enventys Partners to get started today.
Work With Us
Want to learn more about how we’d prepare your product for launch? Request a quote today.
Want To See This Advice In Action?
Check out our case studies and learn more about how we’ve achieved stellar results for our clients.