I’ve always wanted to extend my web development skills in to the real world. It’s nice to be able to make a useful site, but it doesn’t really change your life for the better when you’re not on a computer. Enter embedded systems, and specifically the A …
I’ve always wanted to extend my web development skills in to the real world. It’s nice to be able to make a useful site, but it doesn’t really change your life for the better when you’re not on a computer. Enter embedded systems, and specifically the Arduino. I’ve been fascinated by embedded systems ever since I was a teenager, but the barriers to entry are high and I focused on other things instead. The Arduino WIFI Server changed all of that by making embedded systems extremely accessible. The story of the Arduino and open source hardware is a long one, too long for this introduction, if you’re interested you should start at their website: http://arduino.cc/en/Guide/Introduction
The goal of this project is to tie in a few sensors around my house and allow them to be read via a webserver onboard the arduino. Here’s how it works:
- When the Arduino powers up it will run a setup routine that connects it to my WiFi network
- After the setup routine the Arduino enters in to an infinite loop, listening for connections to the onboard webserver.
- When a web client connects the Arduino will read data from the sensors and send it to the client.
That’s all there is too it, it’s incredibly simple. As with all things technical I did run in to some bugs, but I was able to get it up and running in an evening. If you’ve ever wanted to explore embedded systems, now is the time! I can’t believe how simple this was. Anyone with a software background should be able to start this project with no experience and have it completed in a few hours.
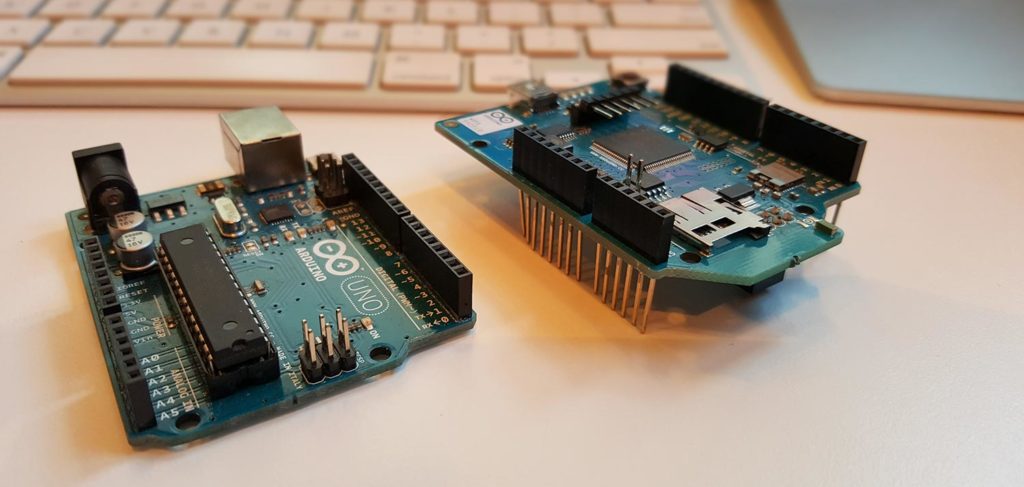
HARDWARE PARTS:
- Arduino Uno R3 or later
- Arduino WiFi shield R3 or later
- Any sensors you want to include, check out SparkFun and Ciseco for ideas
SOFTWARE SETUP:
- Download the Arduino IDE if you don’t have it and start it up
- Mount the WiFi shield on top of the Arduino. The WiFi shield header pins slide right in to the Arduino headers.
- Connect the Arduino via USB to your computer
- Open the example sketch WiFi->ScanNetworks and hit the upload arrow to program the board. Then open the Serial Monitor using the magnifying glass button.
- Verify that your WiFi SSID is displayed correctly and that it is using one of the supported encryption types shown here:http://arduino.cc/en/Guide/ArduinoWiFiShield
- If the SSID isn’t displaying correctly see the troubleshooting section below
- If everything looks good load the example sketch ConnectWithWPA, enter your WiFi credentials, and hit the upload arrow. Open the Serial Monitor using the magnifying glass button. Check to make sure that the Arduino connects and gets and IP address. If not see the troubleshooting section below.
- If the Arduino is able to connect and get an IP address we’re ready to fire up the webserver. Load the example sketch SimpleWebServerWiFi, enter your WiFi credentials, and hit the upload arrow.
- Open up the Serial Monitor again and determine what the Arduino’s IP address is. Once you have that open a web browser on your computer, and point it to http://IP_ADDRESS_GOES_HERE
- You should see the readings off of the analog pins. If the website doesn’t load check the Troubleshooting Webserver port is not open below. Otherwise, congratulations! You just built a webserver on an embedded system! Depending on the kind of sensors you want to use you’ll need to hook them up to the right pins, and now you can read them using the webserver. Keep in mind that Digital Pin 7 is used by the WiFi shield and should not be used.
CONCLUSION:
You made it! This is more of a stepping off point than anything. The possibilities available to you with a knowledge of programming and an embedded system with RF connectivity are mind boggling. For starters, check out Making Things Talk: Using Sensors, Networks, and Arduino to see, hear, and feel your world and Physical Computing
TROUBLESHOOTING WIFI SHIELD WONT CONNECT, SHOWS WRONG SSID DURING SCAN:
I ran in to an issue where the Arduino couldn’t connect to my router for two reasons. The first was the my router had a Guest network that it broadcasts a separate SSID for on the same channel, and this confuses the Arduino WiFi library. It showed up as a really long string in the WiFi scanner sketch. I was able to fix this by disabling it in my router, if you are seeing this you’ll need to figure out how to disable the guest network setting on your router.
After resolving the first issue I noticed that the WiFi scanner was concatenating my SSID with the next SSID in the list. This appears to be an issue with the WiFi library when reading long SSID names which causes it to overflow in to the next SSID name before finding a terminating character. The fix is simple, shorten your SSID. Hopefully the Arduino folks fix this some day.
Fixing both of these issues allowed me to connect just fine.
TROUBLESHOOTING WEBSERVER PORT IS NOT OPEN / CONNECTION REFUSED / UPGRADING ARDUINO WIFI FIRMWARE
Although the sketch ran just fine, when I tried to visit the page nothing happened. When I tried connecting via telnet I got connection refused on port 80, at which point we know that the webserver is not actually running/listening on that port. This was due to an old version of the Arduino WiFi shield firmware, mine shipped to me with version 1.0. To check what version of the firmware is on your WiFi shield, add the following lines to the Webserver sketch in the setup function:
|
Serial.print(F(“Firmware Version:”));
Serial.println(WiFi.firmwareVersion());
|
If you see a version that is older than 1.1, you need to upgrade. Here are the instructions for doing this on OSX:
- Install Ports if you don’t have it, see here: http://www.macports.org/install.php
- Make sure you have the latest version of the Arduino IDE installed, as of this writing it is 1.5. The Arduino IDE has a newer version of the firmware in the Resources directory.
- For some reason the dfu scripts look in a different directory than what the Arduino IDE has so you’ll need to copy the folder
/Applications/Arduino.app/Contents/Resources/Java//hardware/arduino/firmwares/wifishield/binary
to
/Applications/Arduino.app/Contents/Resources/Java//hardware/arduino/firmwares/wifi-shield - Using ports, install the dfu-programmer in a terminal window
sudo port install dfu–programmer
- Now you can do the upgrade. To prepare unplug/power down the Arduino.
- Remove the Arduino WiFi shield from the Arduino.
- BEFORE connecting the WiFi shield to your computer, move the jumper J3 so that the pins are connected. There is only one on the board, so it’s easy.
- Connect the WiFi shield to your computer via a mini usb cable.
- Open a terminal window
- Enter:
cd /Applications/Arduino.app/Contents/Resources/Java//hardware/arduino/firmwares/wifishield/scripts
- Then enter:
sudo sh ArduinoWifiShield_upgrade_mac.sh –a /Applications/Arduino.app/Contents/Resources/Java –f shield
- That command should end with
<span class=“s1”>Done. Remove the J3 jumper and press the RESET button on the shield.</span>
- Thank you!
- If there are any errors, such as No Such File you need to make sure you copied the folders correctly in step 3. Otherwise do what the message says, remove the J3 jumper, and hit the reset button. Disconnect the shield from your computer, and pop it back in the Arduino.
After doing all of that I was able to hit the webserver. I hope this able to help someone!
Want to keep learning about crowdfunding?
Need professional help with your crowdfunding campaign?
Work With Us
Want to learn more about how we’d prepare your product for launch? Request a quote today.
Want To See This Advice In Action?
Check out our case studies and learn more about how we’ve achieved stellar results for our clients.